Java根据IP地址获取对应归属地
2023-04-07 18:23:15 131浏览
1 前言
最近,各大平台都新增了评论区显示发言者ip归属地的功能,例如哔哩哔哩,微博,知乎等等,下面,就来讲讲,Java 中是如何获取 IP 属地的
2 获取IP地址
在Java中有多种获取IP地址的方式,就不一一介绍了,给出了一个最常用的IP地址获取方式,仅供参考,代码如下:
@Slf4j
public class IpUtils {

    /**
     * 获取ip地址
     * @param request request对象
     * @return 返回对应IP地址
     */
    public static String getIpAddress(HttpServletRequest request){
        String ipAddress = null;
        try {
            ipAddress = request.getHeader("X-Forwarded-For");
            if (ipAddress != null && ipAddress.length() != 0 && !"unknown".equalsIgnoreCase(ipAddress)) {
                // 多次反向代理后会有多个ip值,第一个ip才是真实ip
                if (ipAddress.contains(",")) {
                    ipAddress = ipAddress.split(",")[0];
                }
            }
            if (ipAddress == null || ipAddress.length() == 0 || "unknown".equalsIgnoreCase(ipAddress)) {
                ipAddress = request.getHeader("Proxy-Client-IP");
            }
            if (ipAddress == null || ipAddress.length() == 0 || "unknown".equalsIgnoreCase(ipAddress)) {
                ipAddress = request.getHeader("WL-Proxy-Client-IP");
            }
            if (ipAddress == null || ipAddress.length() == 0 || "unknown".equalsIgnoreCase(ipAddress)) {
                ipAddress = request.getHeader("HTTP_CLIENT_IP");
            }
            if (ipAddress == null || ipAddress.length() == 0 || "unknown".equalsIgnoreCase(ipAddress)) {
                ipAddress = request.getRemoteAddr();
            }
        }catch (Exception e) {
            log.error("IPUtils ERROR ",e);
        }
        return ipAddress;
    }

    /**
     * 获取mac地址
     */
    public static String getMacAddress() throws Exception {
        // 取mac地址
        byte[] macAddressBytes = NetworkInterface.getByInetAddress(InetAddress.getLocalHost()).getHardwareAddress();
        // 下面代码是把mac地址拼装成String
        StringBuilder sb = new StringBuilder();
        for (int i = 0; i < macAddressBytes.length; i++) {
            if (i != 0) {
                sb.append("-");
            }
            // mac[i] & 0xFF 是为了把byte转化为正整数
            String s = Integer.toHexString(macAddressBytes[i] & 0xFF);
            sb.append(s.length() == 1 ? 0 + s : s);
        }
        return sb.toString().trim().toUpperCase();
    }

}
对这里出现的几个名词解释一下:
- X-Forwarded-For:一个 HTTP 扩展头部,主要是为了让 Web 服务器获取访问用户的真实 IP 地址。每个 IP地址,每个值通过逗号+空格分开,最左边是最原始客户端的 IP 地址,中间如果有多层代理,每⼀层代理会将连接它的客户端 IP 追加在X-Forwarded-For 右边。
- Proxy-Client-IP:这个一般是经过 Apache http 服务器的请求才会有,用 Apache http做代理时一般会加上Proxy-Client-IP 请求头
- WL-Proxy-Client-IP:也是通过 Apache http 服务器,在 weblogic 插件加上的头。
- X-Real-IP:一般只记录真实发出请求的客户端IP
- HTTP_CLIENT_IP:代理服务器发送的HTTP头。如果是“超级匿名代理”,则返回none值。
3 Ip2region介绍
3.1 99.9% 准确率
数据聚合了一些知名 ip 到地名查询提供商的数据,这些是他们官方的的准确率,经测试着实比经典的纯真 IP 定位准确一些。
ip2region 的数据聚合自以下服务商的开放 API 或者数据(升级程序每秒请求次数 2 到 4 次):
- 01,>80%,淘宝IP地址库,http://ip.taobao.com/%5C
- 02,≈10%,GeoIP,https://geoip.com/%5C
- 03,≈2%,纯真 IP 库,http://www.cz88.net/%5C
备注:如果上述开放 API 或者数据都不给开放数据时 ip2region 将停止数据的更新服务。
3.2 多查询客户端的支持
已经集成的客户端有:java、C#、php、c、python、nodejs、php扩展(php5 和 php7)、golang、rust、lua、lua_c,nginx。

3.3 Ip2region V2.0 特性
3.3.1 标准化的数据格式
每个 ip 数据段的 region 信息都固定了格式:国家|区域|省份|城市|ISP,只有中国的数据绝大部分精确到了城市,其他国家部分数据只能定位到国家,后前的选项全部是 0。
3.3.2 数据去重和压缩
xdb 格式生成程序会自动去重和压缩部分数据,默认的全部 IP 数据,生成的 ip2region.xdb 数据库是 11MiB,随着数据的详细度增加数据库的大小也慢慢增大。
3.3.3 极速查询响应
即使是完全基于 xdb 文件的查询,单次查询响应时间在十微秒级别。
可通过如下两种方式开启内存加速查询:
- vIndex 索引缓存:使用固定的 512KiB 的内存空间缓存 vector index 数据,减少一次 IO
磁盘操作,保持平均查询效率稳定在 10-20 微秒之间。 - xdb 整个文件缓存:将整个 xdb 文件全部加载到内存,内存占用等同于 xdb 文件大小,无磁盘 IO 操作,保持微秒级别的查询效率。
3.3.4 极速查询响应
v2.0 格式的 xdb 支持亿级别的 IP 数据段行数,region 信息也可以完全自定义,例如:你可以在 region 中追加特定业务需求的数据,例如:GPS信息/国际统一地域信息编码/邮编等。也就是你完全可以使用 ip2region 来管理你自己的 IP 定位数据。
4 获取ip2region.xdb文件
为什么要获取ip2region.xdb文件呢?是因为获取ip属地是以这个文件为基础的
4.1 直接获取
文件我已经打包到百度网盘了,小伙伴们可以直接下载,地址如下:
链接:https://pan.baidu.com/s/1JSB0z2Cwl4umujKUzpBhFA
提取码:0zz5
4.2 自行打包
下载项目:
链接:https://pan.baidu.com/s/1wHjUoHCmyH_PVcB9nf3cLw
提取码:aq5y
进入到target文件夹,执行命令:
java -jar ip2region-maker-1.0.0.jar --src=./ip.merge.txt --dst=./ip2region.xdb
5 使用Ip2region V2.0通过 IP 地址,获取对应的省份、城市
5.1 内置的三种查询算法
全部的查询客户端单次查询都在 0.x 毫秒级别,内置了三种查询算法
- memory 算法:整个数据库全部载入内存,单次查询都在0.1x毫秒内,C语言的客户端单次查询在0.00x毫秒级别。
- binary 算法:基于二分查找,基于ip2region.db文件,不需要载入内存,单次查询在0.x毫秒级别。
- b-tree 算法:基于btree算法,基于ip2region.db文件,不需要载入内存,单词查询在0.x毫秒级别,比binary算法更快。
5.2 具体实现方法
5.2.1 引入ip2region依赖
<dependency>
    <groupId>org.lionsoul</groupId>
    <artifactId>ip2region</artifactId>
    <version>2.6.4</version>
</dependency>
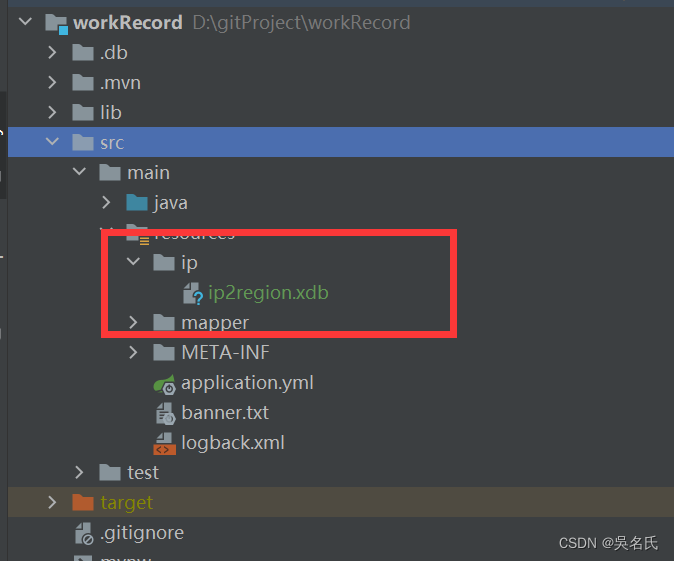
5.2.2 ip2region.xdb 文件,放到工程resources目录下

5.2.3 完全基于ip2region.xdb文件,对用户ip地址进行转换
    /**
     * 获取ip属地(文件扫描)
     * @param ip IP地址
     * @return 返回地址
     */
    public static String getCityInfoByFile(String ip) {
        // 1、创建 searcher 对象
        String dbPath = "D:\\gitProject\\workRecord\\src\\main\\resources\\ip\\ip2region.xdb";
        Searcher searcher;
        try {
            searcher = Searcher.newWithFileOnly(dbPath);
        } catch (IOException e) {
            log.error("failed to create searcher with `{}`: ", dbPath, e);
            return null;
        }

        // 2、查询
        try {
            long sTime = System.nanoTime();
            String region = searcher.search(ip);
            long cost = TimeUnit.NANOSECONDS.toMicros(System.nanoTime() - sTime);
            log.info("{region: {}, ioCount: {}, took: {} μs}", region, searcher.getIOCount(), cost);
            return region;
        } catch (Exception e) {
            log.info("failed to search({}): ", ip, e);
        }
        return null;
		// 3、备注:并发使用,每个线程需要创建一个独立的 searcher 对象单独使用。
    }

    public static void main(String[] args) throws Exception {
        getCityInfoByFile("111.0.72.130");
    }
输出:

5.2.4 缓存 VectorIndex 索引,对用户ip地址进行转换
我们可以提前从 xdb 文件中加载出来 VectorIndex 数据,然后全局缓存,每次创建Searcher 对象的时候使用全局的 VectorIndex 缓存可以减少一次固定的 IO 操作,从而加速查询,减少 IO 压力。
    /**
     * 获取ip属地(缓存 VectorIndex 索引)
     * @param ip IP地址
     * @return 返回地址
     */
    public static String getCityInfoByVectorIndex(String ip) {
        String dbPath = "D:\\gitProject\\workRecord\\src\\main\\resources\\ip\\ip2region.xdb";
        // 1、从 dbPath 中预先加载 VectorIndex 缓存,并且把这个得到的数据作为全局变量,后续反复使用。
        byte[] vIndex;
        try {
            vIndex = Searcher.loadVectorIndexFromFile(dbPath);
        } catch (Exception e) {
            log.error("failed to load vector index from `{}`: ", dbPath, e);
            return null;
        }

        // 2、使用全局的 vIndex 创建带 VectorIndex 缓存的查询对象。
        Searcher searcher;
        try {
            searcher = Searcher.newWithVectorIndex(dbPath, vIndex);
        } catch (Exception e) {
            log.error("failed to create vectorIndex cached searcher with `{}`: ", dbPath, e);
            return null;
        }

        // 3、查询
        try {
            long sTime = System.nanoTime();
            String region = searcher.search(ip);
            long cost = TimeUnit.NANOSECONDS.toMicros(System.nanoTime() - sTime);
            log.info("{region: {}, ioCount: {}, took: {} μs}\n", region, searcher.getIOCount(), cost);
            return region;
        } catch (Exception e) {
            log.error("failed to search({}): ", ip, e);
        }
        return null;
		// 备注:每个线程需要单独创建一个独立的 Searcher 对象,但是都共享全局的制度 vIndex 缓存。
    }

    public static void main(String[] args) throws Exception {
        getCityInfoByVectorIndex("111.0.72.130");
    }
输出:

5.2.5 缓存整个 xdb 数据,对用户ip地址进行转换
我们也可以预先加载整个 ip2region.xdb 的数据到内存,然后基于这个数据创建查询对象来实现完全基于文件的查询,类似之前的 memory search。
    /**
     * 获取ip属地(缓存整个 xdb 数据)
     * @param ip IP地址
     * @return 返回地址
     */
    public static String getCityInfoByMemorySearch(String ip) {
        String dbPath = "D:\\gitProject\\workRecord\\src\\main\\resources\\ip\\ip2region.xdb";

        // 1、从 dbPath 加载整个 xdb 到内存。
        byte[] cBuff;
        try {
            cBuff = Searcher.loadContentFromFile(dbPath);
        } catch (Exception e) {
            log.error("failed to load content from `{}`: ", dbPath, e);
            return null;
        }

        // 2、使用上述的 cBuff 创建一个完全基于内存的查询对象。
        Searcher searcher;
        try {
            searcher = Searcher.newWithBuffer(cBuff);
        } catch (Exception e) {
            log.error("failed to create content cached searcher: ", e);
            return null;
        }

        // 3、查询
        try {
            long sTime = System.nanoTime();
            String region = searcher.search(ip);
            long cost = TimeUnit.NANOSECONDS.toMicros(System.nanoTime() - sTime);
            log.info("{region: {}, ioCount: {}, took: {} μs}\n", region, searcher.getIOCount(), cost);
        } catch (Exception e) {
            log.error("failed to search({}): ", ip, e);
        }
        return null;
        // 备注:并发使用,用整个 xdb 数据缓存创建的查询对象可以安全的用于并发,也就是你可以把这个 searcher 对象做成全局对象去跨线程访问。
    }

    public static void main(String[] args) throws Exception {
        getCityInfoByMemorySearch("111.0.72.130");
    }
输出:

6 总结
根据IP地址获取对应归属地的介绍就到这了,有问题的小伙伴们可以在评论区讨论
好博客就要一起分享哦!分享海报
此处可发布评论
评论(0)展开评论
展开评论


