【打造前端现代化规范工程】Vite + ESLint + Husky + Commitlint + Lint-staged
标签: 【打造前端现代化规范工程】Vite + ESLint + Husky + Commitlint + Lint-staged Python博客 51CTO博客
2023-04-02 18:23:34 137浏览
前言
本文虽然使用 Vite 创建了一个 Vue3 + TS 的项目,但其实文中涉及的内容和技术栈并没有关系,主要是结合 ESLint ,Husky,等第三方库实现比较规范的现代化前端工程,可应用于任何技术栈的项目中
本文所涉及的工具,技术栈如下
代码编辑器
VSCode
VSCode 插件
VolarprittierESLintESLint Chinese Rules
包管理器
yarn
技术栈
Vue:3.2.47Typescript:*Vite:4.2.0
第三方库
ESLinteslinteslint-plugin-vueeslint-plugin-importvue-eslint-parsereslint-config-airbnb-base@typescript-eslint/parser@typescript-eslint/eslint-pluginhuskylint-stagedcommitizencommitlintcz-customizablecommitlint-config-cz@commitlint/config-conventional
使用 Vite 初始化工程
项目中使用的的是 vite 4.2.0 的版本
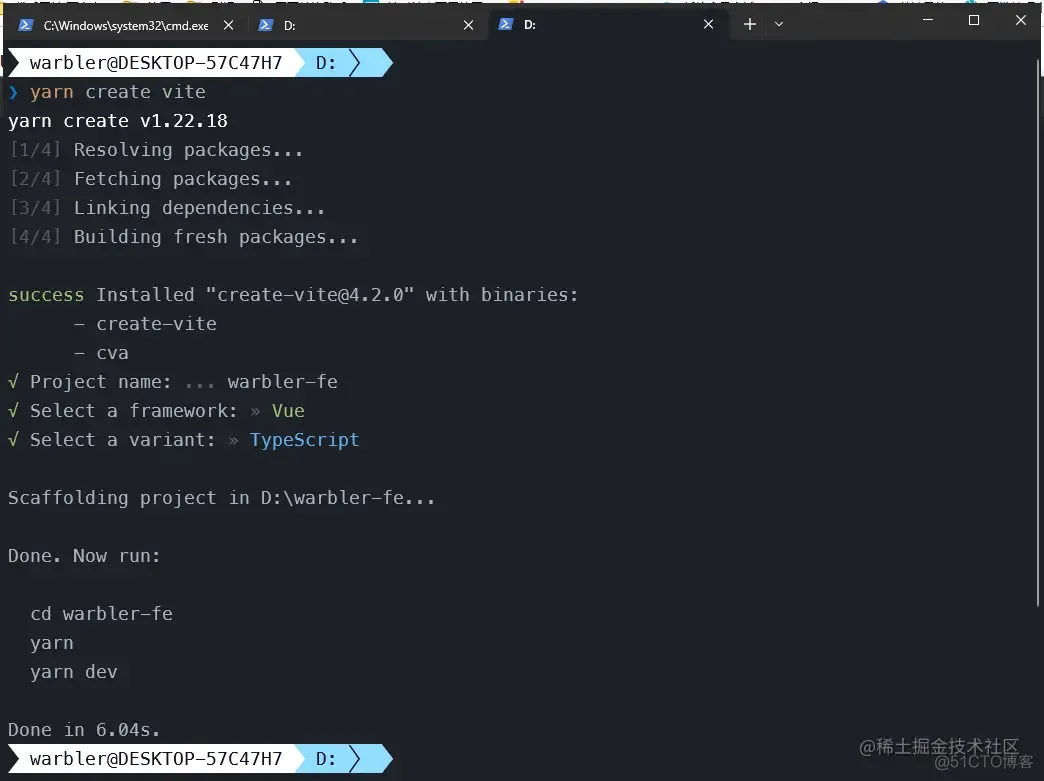
使用 yarn 执行
yarn create vite输入项目名称,选择 Vue, TypeScrip

按照提示执行以下命令即可
cd warbler-fe
 yarn
 yarn dev
启动后的初始页面如下

工程结构如下

如果需要在开发环境启动后 , 自动打开浏览器 , 需要添加 --open
// package.json
  "scripts": {
    "dev": "vite --open",
  },
package.json 如下
// package.json
{
  "name": "warbler-fe",
  "private": true,
  "version": "0.0.0",
  "type": "module",
  "scripts": {
    "dev": "vite --open",
    "build": "vue-tsc && vite build",
    "preview": "vite preview"
  },
  "dependencies": {
    "vue": "^3.2.47"
  },
  "devDependencies": {
    "@vitejs/plugin-vue": "^4.1.0",
    "typescript": "*",
    "vite": "^4.2.0",
    "vue-tsc": "^1.2.0"
  }
}
代码书写规范
ESLint
安装相关依赖
yarn add -D
eslint
eslint-plugin-vue
eslint-plugin-import
vue-eslint-parser
eslint-config-airbnb-base
@typescript-eslint/parser
@typescript-eslint/eslint-plugin
根目录下新建 .eslintrc.cjs 文件, 编辑内容如下, rules 里面的内容根据实际需求自行添加
// .eslintrc.cjs
module.exports = {
  root: true,
  globals: {
    defineProps: 'readonly',
    defineExpose: 'readonly',
    defineEmits: 'readonly',
    withDefaults: 'readonly',
  },
  extends: ['plugin:@typescript-eslint/recommended', 'plugin:vue/vue3-recommended', 'airbnb-base'],
  parserOptions: {
    parser: '@typescript-eslint/parser',
    ecmaVersion: 'latest',
  },
  rules: {
    // 关闭函数名后面必须有空格的验证
    'space-before-function-paren': 0,
    // 关闭强制不变的变量使用 const, 因为自动格式化 有时候会把 let 变成 const
    'perfer-const': 0,
    // 允许行尾分号
    semi: 0,
    // 允许尾后逗号
    'comma-dangle': 0,
  },
};
根目录下新建 .eslintignore 文件, 用来让 eslint 不检查这些文件,内容跟 .gitignore 差不多
// .eslintignore
# Logs
logs
*.log
npm-debug.log*
yarn-debug.log*
yarn-error.log*
pnpm-debug.log*
lerna-debug.log*

node_modules
dist
dist-ssr
*.local
.history

# Editor directories and files
.vscode/*
!.vscode/extensions.json
.idea
.DS_Store
*.suo
*.ntvs*
*.njsproj
*.sln
*.sw?

// 不加这两个会报错
.cz-config.js
package.json
prittier
prettier 是按照 eslint 的规范进行格式化的工具,如果冲突则 prettier 优先级高
安装 vscode 的 prettier 插件 ,无需在项目中安装 prettier

然后找到设置中的 prettier 插件 ,可以进行傻瓜式配置

也可以在项目根目录下新建 .prettierrc 文件,优先级高于手动配置的内容,本文不使用此方法
vscode 设置自动格式化
在项目根目录下新建 .vscode/setting.json 文件,写入以下内容,即可在保存代码的时候自动按照 eslint 和 prettier 的规范进行代码格式化
// 需要 vscode 安装 Prettier - Code formatter 扩展
{
  // 控制编辑器是否自动格式化粘贴的内容。格式化程序必须可用,并且能针对文档中的某一范围进行格式化
  "editor.formatOnPaste": true,
  // 在保存时格式化文件。格式化程序必须可用,延迟后文件不能保存,并且编辑器不能关闭。
  "editor.formatOnSave": true,
  // 控制编辑器在键入一行后是否自动格式化该行。
  "editor.formatOnType": false,
  // 当编辑器失去焦点时,将自动保存未保存的编辑器。
  "files.autoSave": "onFocusChange",
  //在一定数量的字符后显示标尺
  "editor.rulers": [100],
  // 定义一个默认格式化程序, 该格式化程序优先于所有其他格式化程序设置。必须是提供格式化程序的扩展的标识符。
  "editor.defaultFormatter": "esbenp.prettier-vscode",
  // 忽略单词
  "cSpell.words": ["vite"]
}
代码提交规范
安装相关依赖
yarn add -D
husky
lint-staged
commitizen
commitlint
cz-customizable
commitlint-config-cz
@commitlint/config-conventional
配置 husky
执行下面两行代码
// 在 package.json 中添加脚本
npm set-script prepare "husky install"
// 初始化 husky,将 git hooks 钩子交由 husky 执行
npm run prepare
执行完这两行代码以后,发生了两件事情
第一个是 package.json 中新增了一个脚本
"scripts": {
    "prepare": "husky install"
  },
第二个是根目下新增了 .husky 文件夹,里面的内容不用管

再执行以下命令
npx husky add .husky/pre-commit "npx lint-staged --allow-empty"这个命令会在 .husky 里面生成一个 pre-commit 文件,在 pre-commit 这个钩子里就可以执行 lint-staged 了


在 package.json 中添加以下内容,处理对应后缀的文件
"lint-staged": {
    "*.{js,jsx,ts,tsx,vue,json}": [
      "eslint --fix"
    ]
  }
到这里为止,提交代码的时候自动进行代码检查的功能已经实现了,来测试一下结果。

可以看到,这段代码有两个 eslint 的错误,第一个是注释的双斜线后面应该有一个空格,可以通过代码格式化解决,第二个是不能出现空的代码块,不能通过格式化来解决,提交一下,看看会有什么样的结果。

最后也是提交失败了,再来看看我们提交的文件,并没有什么变化

修改代码进行第二次测试,这次只留一个格式的错误

提交代码,这次提交成功了

再来看看提交的文件,已经替我们把格式上的错误修复好了

最后我们得到的结论就是:提交代码的时候会自动进行格式化,如果有格式化解决不了的错误,就会报错
配置 commitlint
执行代码
npx husky add .husky/commit-msg 'npx --no-install commitlint --edit "$1"'这行代码会在 .husky 文件夹下生成 commit-msg 文件,内容如下

根目录下新建 commitlint.config.js 文件
// commitlint.config.js
module.exports = {
  // 继承第三方库的配置
  extends: ['cz'],
  rules: {
    // 自定义规则,
  },
};
根目录下新建 .cz-config.js 文件,这个文件和上个文件是用来配置提交时候的信息,以减轻我们的心智负担。
// .cz-config.js
module.exports = {
  types: [
    { value: '? 新增  ', name: '新增:  新的内容' },
    { value: '? 修复  ', name: '修复:  修复一个Bug' },
    { value: '? 文档  ', name: '文档:  变更的只有文档' },
    { value: '? 格式  ', name: '格式:  空格, 分号等格式修复' },
    { value: '♻️ 重构  ', name: '重构:  代码重构,注意和特性、修复区分开' },
    { value: '⚡️ 性能  ', name: '性能:  提升性能' },
    { value: '✅ 测试  ', name: '测试:  添加一个测试' },
    { value: '? 工具  ', name: '工具:  开发工具变动(构建、脚手架工具等)' },
    { value: '⏪ 回滚  ', name: '回滚:  代码回退' },
  ],

  // Specify the scopes for your particular project
  scopes: [],
  messages: {
    type: '选择一种你的提交类型: \n',
    cope: '选择一个 scope(可选)\n:',
    customScope: '请输入修改范围(可选): \n',
    subject: '短说明: \n',
    body: '长说明,使用 "|" 换行(可选):\n',
    breaking: '非兼容性说明 (可选): \n',
    footer: '关联关闭的issue,例如:#31, #34(可选): \n',
    confirmCommit: '确定提交说明? \n',
  },
  // 跳过空的 scope
  skipEmptyScopes: true,
  skipQuestions: ['scopes', 'breaking', 'body', 'footer'],
  // 设置为 true,在 scope 选择的时候,会有 empty 和 custom 可以选择
  // 顾名思义,选择 empty 表示 scope 缺省,如果选择 custom,则可以自己输入信息
  allowCustomScopes: true,
  // 只有我们 type 选择了 feat 或者是 fix,才会询问我们 breaking message.
  allowBreakingChanges: ['feat', 'fix'],
};
最后修改 package.json 文件,添加两条命令,一个命令用于手动选择需要提交的文件后,执行 git-cz,另一个命令用于自动提交全部文件,然后执行 git-cz 。
// package.json
  "scripts": {
    "commit": "git-cz",
    "commit:all": "git add . && git-cz",
  },
  "config": {
    "commitizen": {
      "path": "node_modules/cz-customizable"
    }
  }
到这里为止,所有的配置都完成了,来测试一下。
先测试手动选择文件提交,执行 yarn commit

执行 git push 推送一下代码,然后去 github 仓库上看一眼,这就是我们刚才提交的那个 commit 的信息

再测试一下默认全部提交, 执行 yarn commit:all

执行 git push 推送一下代码,然后再去 github 仓库上看一眼,没有问题

同时有个麻烦就是每次执行完 yarn commit 之后, 都要手动执行一下 git push 推送代码,所以直接索性把推送代码的步骤也放到 husky 里。
执行代码
npx husky add .husky/post-commit 'git push'生成以下文件

再次提交代码试一下,执行 yarn commit:all

这样就没问题了,不需要的可以不添加,更多的功能可以根据实际需求进行拓展

总结
最后看一下目录结构

package.json 文件最终如下,得删掉 "type": "module", 不然会报错
{
  "name": "warbler-fe",
  "private": true,
  "version": "0.0.0",
  "scripts": {
    "dev": "vite --open",
    "build": "vue-tsc && vite build",
    "preview": "vite preview",
    "commit": "git-cz",
    "commit:all": "git add . && git-cz",
    "prepare": "husky install"
  },
  "dependencies": {
    "vue": "^3.2.47"
  },
  "devDependencies": {
    "@commitlint/config-conventional": "^17.4.4",
    "@typescript-eslint/eslint-plugin": "^5.56.0",
    "@typescript-eslint/parser": "^5.56.0",
    "@vitejs/plugin-vue": "^4.1.0",
    "commitizen": "^4.3.0",
    "commitlint": "^17.4.4",
    "commitlint-config-cz": "^0.13.3",
    "cz-customizable": "^7.0.0",
    "eslint": "^8.36.0",
    "eslint-config-airbnb-base": "^15.0.0",
    "eslint-plugin-import": "^2.27.5",
    "eslint-plugin-vue": "^9.9.0",
    "husky": "^8.0.3",
    "lint-staged": "^13.2.0",
    "typescript": "*",
    "vite": "^4.2.0",
    "vue-eslint-parser": "^9.1.0",
    "vue-tsc": "^1.2.0"
  },
  "lint-staged": {
    "*.{js,jsx,ts,tsx,vue,json}": [
      "eslint --fix"
    ]
  },
  "config": {
    "commitizen": {
      "path": "node_modules/cz-customizable"
    }
  }
}好博客就要一起分享哦!分享海报
此处可发布评论
评论(0)展开评论
展开评论


