Linux 0.11启动过程分析(一)
标签: Linux 0.11启动过程分析(一) JavaScript博客 51CTO博客
2023-04-01 18:23:42 144浏览
Linux 0.11 系列文章
Linux 0.11启动过程分析(一)Linux 0.11 fork 函数(二)
Linux0.11 缺页处理(三)
Linux0.11 根文件系统挂载(四)
Linux0.11 文件打开open函数(五)
Linux0.11 execve函数(六)
文章目录
- Linux 0.11 系列文章
- 一、GDB调试方案
- 二、启动分析
- 1、BIOS 加载
- 2、bootsect.s
- 3、setup.s
- 4、head.s
- 5、main 函数
一、GDB调试方案
Linux 0.11-调试 Linux 最早期的代码-36
二、启动分析
1、BIOS 加载
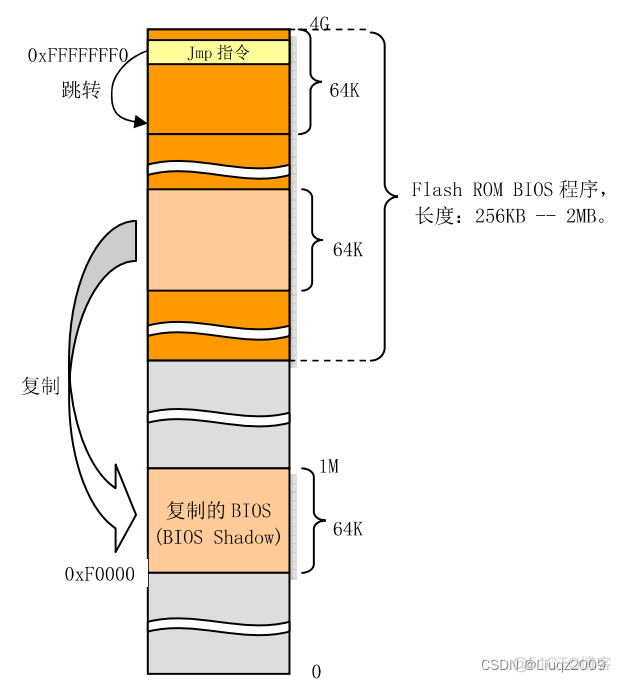
电脑启动,CPU指向0xFFFFFFF0处,这里正好是系统ROM BIOS存放的地址。即开始执行BIOS指令。为了保持向下兼容,就会把与原PC兼容的BIOS代码和数据复制到低端1M末端的64K处。最后BIOS会把操作系统引导程序加载到内存0x7c00处。如下图:

2、bootsect.s
bootsect.s 把自己移动到内存0x90000(576KB)处,并把启动设备中后2KB字节代码(setup.s)读入到内存0x90200 处,并把内核其它部分(system模块)读入到0x10000(64KB)处。

3、setup.s
setup.s把system模块移动到内存0处。最后会调用system模块。其内存如下:

4、head.s
head.s 位于system模块的开头处,setup.s 把控制权交给 head.s 后,head.s 程序执行结束后,其内存如下:


高速缓冲部分还要扣除被 显存 和 ROM BIOS 占用的部分,其用于磁盘等块设备临时存放数据的地方,在 buffer_init 函数中初始化。主内存区由内存管理模块 mm 通过分页机制进行管理分配。
高速缓冲区初始化过程中,初始化程序从整个缓冲区的两端开始,分别同时设置缓冲块头结构和划分出对应的缓冲区块 (1K)。缓冲区的 高端 被划分成一个个 1K 的缓冲块,低端 则分别建立起对应各缓冲块的缓冲头结构 buffer_head 。该头结构用于描述对应缓冲块的属性,并且用于把所有缓冲头连接成链表。
struct buffer_head {
    char * b_data;              		/* 指向该缓冲块中数据区(1K字节)的指针 */
    unsigned long b_blocknr;    		/* 块号 */
    unsigned short b_dev;       		/* 数据源的块设备号 (0 = free) */
    unsigned char b_uptodate;   		/* 更新标志,表示数据是否已更新 */
    unsigned char b_dirt;       		/* 修改标志,0-未修改clean,1-已修改dirty */
    unsigned char b_count;      		/* 使用该块的用户个数 */
    unsigned char b_lock;       		/* 缓冲区是否被锁定。0 - ok, 1 -locked */
    struct task_struct * b_wait;    	/* 指向等待该缓冲区解锁的任务 */
    struct buffer_head * b_prev;    	/* hash 队列上前一块 */
    struct buffer_head * b_next;    	/* hash 队列上下一块 */
    struct buffer_head * b_prev_free;   /* 空闲表上前一块 */
    struct buffer_head * b_next_free;   /* 空闲表下前一块 */
};

// fs/buffer.c
// end 为内核模块结束地址
struct buffer_head * start_buffer = (struct buffer_head *) &end;

void buffer_init(long buffer_end)
{
    struct buffer_head * h = start_buffer;
    void * b;
    int i;
    // 640K ~ 1M 为显示区域和BIOS区域(1M末端处,大小为64K)
    if (buffer_end == 1<<20)
        b = (void *) (640*1024);
    else
        b = (void *) buffer_end;
    while ( (b -= BLOCK_SIZE) >= ((void *) (h+1)) ) {
        h->b_dev = 0;
        h->b_dirt = 0;
        h->b_count = 0;
        h->b_lock = 0;
        h->b_uptodate = 0;
        h->b_wait = NULL;
        h->b_next = NULL;
        h->b_prev = NULL;
        h->b_data = (char *) b;
        h->b_prev_free = h-1;
        h->b_next_free = h+1;
        h++;
        NR_BUFFERS++;
        if (b == (void *) 0x100000)
            b = (void *) 0xA0000;
    }
    h--;
    free_list = start_buffer;
    free_list->b_prev_free = h;
    h->b_next_free = free_list;
    for (i=0;i<NR_HASH;i++)
        hash_table[i]=NULL;
}
初始化后的示意图:

内存管理初始化代码,mem_map进行管理内存是否有使用。每个字符管理4K大小内存。
// mm/memory.c
static unsigned char mem_map [ PAGING_PAGES ] = {0,};
void mem_init(long start_mem, long end_mem)
{
    int i;

    HIGH_MEMORY = end_mem;
    for (i=0 ; i<PAGING_PAGES ; i++)
        mem_map[i] = USED;
    i = MAP_NR(start_mem);
    end_mem -= start_mem;
    end_mem >>= 12;
    while (end_mem-->0)
        mem_map[i++]=0;
}
head.s 最后会调用 main.c 中的 main() 函数。
5、main 函数

void main(void)        /* This really IS void, no error here. */
{            /* The startup routine assumes (well, ...) this */
/*
 * Interrupts are still disabled. Do necessary setups, then
 * enable them
 */
    ROOT_DEV = ORIG_ROOT_DEV;
    drive_info = DRIVE_INFO;
    memory_end = (1<<20) + (EXT_MEM_K<<10);
    memory_end &= 0xfffff000;
    if (memory_end > 16*1024*1024)
        memory_end = 16*1024*1024;
    if (memory_end > 12*1024*1024)
        buffer_memory_end = 4*1024*1024;
    else if (memory_end > 6*1024*1024)
        buffer_memory_end = 2*1024*1024;
    else
        buffer_memory_end = 1*1024*1024;
    main_memory_start = buffer_memory_end;
#ifdef RAMDISK
    main_memory_start += rd_init(main_memory_start, RAMDISK*1024);
#endif
    mem_init(main_memory_start,memory_end);
    trap_init();
    blk_dev_init();
    chr_dev_init();
    tty_init();
    time_init();
    sched_init();
    buffer_init(buffer_memory_end);
    hd_init();
    floppy_init();
    sti();
    move_to_user_mode();
    if (!fork()) {        /* we count on this going ok */
        init();
    }
/*
 *   NOTE!!   For any other task 'pause()' would mean we have to get a
 * signal to awaken, but task0 is the sole exception (see 'schedule()')
 * as task 0 gets activated at every idle moment (when no other tasks
 * can run). For task0 'pause()' just means we go check if some other
 * task can run, and if not we return here.
 */
    for(;;) pause();
}
好博客就要一起分享哦!分享海报
此处可发布评论
评论(0)展开评论
展开评论

