nacos原理(一)Springcloud 配置中心接入原理&客户端拉取配置原理
标签: nacos原理(一)Springcloud 配置中心接入原理&客户端拉取配置原理 JavaScript博客 51CTO博客
2023-03-25 18:45:44 135浏览
之前已经了解到Springcloud 环境对bootstrap.yml 加载的原理,也就是加载bootstrap的时机比较靠前。接下来简单研究下Springcloud环境中配置中心的加载以及动态更新原理。
简单研究下配置中心nacos客户端是如何拉取配置以及服务端配置更新后是如何通知客户端的。
1. Springcloud 配置中心接入原理
在 SpringCloud 场景下,SpringCloud 规范中提供了 PropertySourceBootstrapConfiguration 继承 ApplicationContextInitializer,另外还提供了个 PropertySourceLocator,二者配合完成配置中心的接入。
核心代码如下:
@Configuration(proxyBeanMethods = false)
@EnableConfigurationProperties(PropertySourceBootstrapProperties.class)
public class PropertySourceBootstrapConfiguration implements
		ApplicationContextInitializer<ConfigurableApplicationContext>, Ordered {

	/**
	 * Bootstrap property source name.
	 */
	public static final String BOOTSTRAP_PROPERTY_SOURCE_NAME = BootstrapApplicationListener.BOOTSTRAP_PROPERTY_SOURCE_NAME
			+ "Properties";

	private static Log logger = LogFactory
			.getLog(PropertySourceBootstrapConfiguration.class);

	private int order = Ordered.HIGHEST_PRECEDENCE + 10;

	@Autowired(required = false)
	private List<PropertySourceLocator> propertySourceLocators = new ArrayList<>();

	@Override
	public int getOrder() {
		return this.order;
	}

	public void setPropertySourceLocators(
			Collection<PropertySourceLocator> propertySourceLocators) {
		this.propertySourceLocators = new ArrayList<>(propertySourceLocators);
	}

	@Override
	public void initialize(ConfigurableApplicationContext applicationContext) {
		List<PropertySource<?>> composite = new ArrayList<>();
		AnnotationAwareOrderComparator.sort(this.propertySourceLocators);
		boolean empty = true;
		ConfigurableEnvironment environment = applicationContext.getEnvironment();
		for (PropertySourceLocator locator : this.propertySourceLocators) {
			Collection<PropertySource<?>> source = locator.locateCollection(environment);
			if (source == null || source.size() == 0) {
				continue;
			}
			List<PropertySource<?>> sourceList = new ArrayList<>();
			for (PropertySource<?> p : source) {
				sourceList.add(new BootstrapPropertySource<>(p));
			}
			logger.info("Located property source: " + sourceList);
			composite.addAll(sourceList);
			empty = false;
		}
		if (!empty) {
			MutablePropertySources propertySources = environment.getPropertySources();
			String logConfig = environment.resolvePlaceholders("${logging.config:}");
			LogFile logFile = LogFile.get(environment);
			for (PropertySource<?> p : environment.getPropertySources()) {
				if (p.getName().startsWith(BOOTSTRAP_PROPERTY_SOURCE_NAME)) {
					propertySources.remove(p.getName());
				}
			}
			insertPropertySources(propertySources, composite);
			reinitializeLoggingSystem(environment, logConfig, logFile);
			setLogLevels(applicationContext, environment);
			handleIncludedProfiles(environment);
		}
	}
  ...
PropertySourceBootstrapConfiguration对象初始化过程中会将所有的PropertySourceLocator 注入进来。在initialize 方法中
遍历所有的PropertySourceLocator 进行配置的获取(返回值是Collection<PropertySource<?>>,也可以看出这里支持多配置中心),获取到配置后调用 insertPropertySources 方法将所有的 PropertySource(封装的一个个配置文件)添加到 Spring 的环境变量 environment 中。
这里有三个重点:
- PropertySourceBootstrapConfiguration 注入时机
在Spring-cloud-context-xxx.jar/spring.factories 文件中有如下配置:
# Bootstrap components
org.springframework.cloud.bootstrap.BootstrapConfiguration=\
org.springframework.cloud.bootstrap.config.PropertySourceBootstrapConfiguration,\
org.springframework.cloud.bootstrap.encrypt.EncryptionBootstrapConfiguration,\
org.springframework.cloud.autoconfigure.ConfigurationPropertiesRebinderAutoConfiguration,\
org.springframework.boot.autoconfigure.context.PropertyPlaceholderAutoConfiguration
这里需要注意必须用org.springframework.cloud.bootstrap.BootstrapConfiguration 注入相关的自动配置类。org.springframework.cloud.bootstrap.BootstrapImportSelector#selectImports 这里类似Springboot 的自动配置,完成springcloud 这个顺序优先加载,否则PropertySourceBootstrapConfiguration#initialize 方法中获取不到locator。
- com.alibaba.cloud.nacos.client.NacosPropertySourceLocator 注入时机
com.alibaba.cloud.nacos.NacosConfigBootstrapConfiguration
@Configuration
@ConditionalOnProperty(
    name = {"spring.cloud.nacos.config.enabled"},
    matchIfMissing = true
)
public class NacosConfigBootstrapConfiguration {
    public NacosConfigBootstrapConfiguration() {
    }

    @Bean
    @ConditionalOnMissingBean
    public NacosConfigProperties nacosConfigProperties() {
        return new NacosConfigProperties();
    }

    @Bean
    public NacosPropertySourceLocator nacosPropertySourceLocator(NacosConfigProperties nacosConfigProperties) {
        return new NacosPropertySourceLocator(nacosConfigProperties);
    }
}- org.springframework.cloud.bootstrap.config.PropertySourceBootstrapConfiguration#initialize 调用时机
1.org.springframework.boot.SpringApplication#run(java.lang.String...)
2.org.springframework.boot.SpringApplication#prepareContext
3.org.springframework.boot.SpringApplication#applyInitializers
4.org.springframework.cloud.bootstrap.config.PropertySourceBootstrapConfiguration#initialize
2. NacosPropertySourceLocator 拉配置原理
最直观的想象就是http方式去拉取配置。 将配置拉到本地,然后add 到environment 对象内部。 当server 端有配置更改的时候,客户端通过长轮询或者定时任务去拉取修改过的配置,然后对本地进行更新。 下面研究其具体过程。
请求入口: com.alibaba.cloud.nacos.client.NacosPropertySourceLocator#locate
public PropertySource<?> locate(Environment env) {

		ConfigService configService = nacosConfigProperties.configServiceInstance();

		if (null == configService) {
			log.warn("no instance of config service found, can't load config from nacos");
			return null;
		}
		long timeout = nacosConfigProperties.getTimeout();
		nacosPropertySourceBuilder = new NacosPropertySourceBuilder(configService,
				timeout);
		String name = nacosConfigProperties.getName();

		String dataIdPrefix = nacosConfigProperties.getPrefix();
		if (StringUtils.isEmpty(dataIdPrefix)) {
			dataIdPrefix = name;
		}

		if (StringUtils.isEmpty(dataIdPrefix)) {
			dataIdPrefix = env.getProperty("spring.application.name");
		}

		CompositePropertySource composite = new CompositePropertySource(
				NACOS_PROPERTY_SOURCE_NAME);

		loadSharedConfiguration(composite);
		loadExtConfiguration(composite);
		loadApplicationConfiguration(composite, dataIdPrefix, nacosConfigProperties, env);

		return composite;
	}
dataIdPrefix是在nacos的数据ID前缀,可以看到是优先读取配置,如果配置没读取到就读当前的服务名称。
- nacosConfigProperties.configServiceInstance(); 会创建NacosConfigService 配置服务
内部包含agent(http客户端), ClientWorker 内部长轮询的客户端。
返回的对象信息如下:
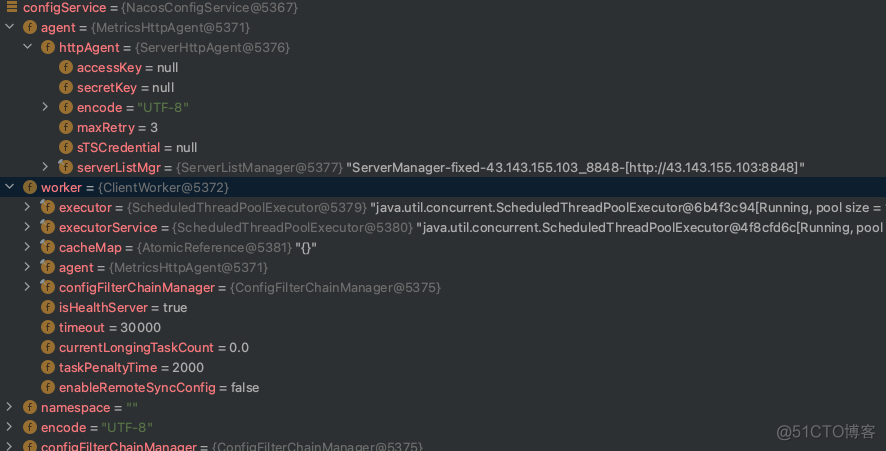
代码内部会调用到 com.alibaba.nacos.client.config.NacosConfigService#NacosConfigService 的构造方法创建该对象:
public NacosConfigService(Properties properties) throws NacosException {
        String encodeTmp = properties.getProperty(PropertyKeyConst.ENCODE);
        if (StringUtils.isBlank(encodeTmp)) {
            encode = Constants.ENCODE;
        } else {
            encode = encodeTmp.trim();
        }
        initNamespace(properties);
        agent = new MetricsHttpAgent(new ServerHttpAgent(properties));
        agent.start();
        worker = new ClientWorker(agent, configFilterChainManager, properties);
}- 创建一个 nacosPropertySourceBuilder, 然后获取 dataIdPrefix(默认为服务名称)
- 创建一个CompositePropertySource, 然后进行加载配置,加载完成之后返回该对象
- 加载配置
loadSharedConfiguration(composite);、loadExtConfiguration(composite); 都会直接跳出。 相关的配置在 loadApplicationConfiguration(composite, dataIdPrefix, nacosConfigProperties, env); 进行加载
private void loadApplicationConfiguration(
			CompositePropertySource compositePropertySource, String dataIdPrefix,
			NacosConfigProperties properties, Environment environment) {

		String fileExtension = properties.getFileExtension();
		String nacosGroup = properties.getGroup();

		loadNacosDataIfPresent(compositePropertySource,
				dataIdPrefix + DOT + fileExtension, nacosGroup, fileExtension, true);
		for (String profile : environment.getActiveProfiles()) {
			String dataId = dataIdPrefix + SEP1 + profile + DOT + fileExtension;
			loadNacosDataIfPresent(compositePropertySource, dataId, nacosGroup,
					fileExtension, true);
		}
	}

	private void loadNacosDataIfPresent(final CompositePropertySource composite,
			final String dataId, final String group, String fileExtension,
			boolean isRefreshable) {
		if (NacosContextRefresher.getRefreshCount() != 0) {
			NacosPropertySource ps;
			if (!isRefreshable) {
				ps = NacosPropertySourceRepository.getNacosPropertySource(dataId);
			}
			else {
				ps = nacosPropertySourceBuilder.build(dataId, group, fileExtension, true);
			}

			composite.addFirstPropertySource(ps);
		}
		else {
			NacosPropertySource ps = nacosPropertySourceBuilder.build(dataId, group,
					fileExtension, isRefreshable);
			composite.addFirstPropertySource(ps);
		}
	}
1》loadApplicationConfiguration 方法内部循环外面先将当前应用的配置加进去。比如当前应用名称为:template,那么加进去的为:

dataId 为 template.yml,group 为DEFAULT_GROUP。
2》for循环遍历当前激活的profile, 然后添加到nacos配置读取,默认读取的是dev 环境

com.alibaba.cloud.nacos.client.NacosPropertySourceLocator#loadNacosDataIfPresent 方法内部调用 com.alibaba.cloud.nacos.client.NacosPropertySourceBuilder#build 进行获取配置,获取配置也是从这里开始的。
1. com.alibaba.cloud.nacos.client.NacosPropertySourceBuilder#build 客户端获取配置解读
NacosPropertySource build(String dataId, String group, String fileExtension,
			boolean isRefreshable) {
		Properties p = loadNacosData(dataId, group, fileExtension);
		NacosPropertySource nacosPropertySource = new NacosPropertySource(group, dataId,
				propertiesToMap(p), new Date(), isRefreshable);
		NacosPropertySourceRepository.collectNacosPropertySources(nacosPropertySource);
		return nacosPropertySource;
}- com.alibaba.cloud.nacos.client.NacosPropertySourceBuilder#loadNacosData
private Properties loadNacosData(String dataId, String group, String fileExtension) {
		String data = null;
		try {
			data = configService.getConfig(dataId, group, timeout);
			if (!StringUtils.isEmpty(data)) {
				log.info(String.format("Loading nacos data, dataId: '%s', group: '%s'",
						dataId, group));

				if (fileExtension.equalsIgnoreCase("properties")) {
					Properties properties = new Properties();

					properties.load(new StringReader(data));
					return properties;
				}
				else if (fileExtension.equalsIgnoreCase("yaml")
						|| fileExtension.equalsIgnoreCase("yml")) {
					YamlPropertiesFactoryBean yamlFactory = new YamlPropertiesFactoryBean();
					yamlFactory.setResources(new ByteArrayResource(data.getBytes()));
					return yamlFactory.getObject();
				}

			}
		}
		catch (NacosException e) {
			log.error("get data from Nacos error,dataId:{}, ", dataId, e);
		}
		catch (Exception e) {
			log.error("parse data from Nacos error,dataId:{},data:{},", dataId, data, e);
		}
		return EMPTY_PROPERTIES;
}这里的核心逻辑:configService.getConfig(dataId, group, timeout) 获取配置;根据后缀调用最后的FactoryBean,然后将String 转换为Properties 对象。
(1). configService.getConfig(dataId, group, timeout); 获取配置
private String getConfigInner(String tenant, String dataId, String group, long timeoutMs) throws NacosException {
        group = null2defaultGroup(group);
        ParamUtils.checkKeyParam(dataId, group);
        ConfigResponse cr = new ConfigResponse();

        cr.setDataId(dataId);
        cr.setTenant(tenant);
        cr.setGroup(group);

        // 优先使用本地配置
        String content = LocalConfigInfoProcessor.getFailover(agent.getName(), dataId, group, tenant);
        if (content != null) {
            LOGGER.warn("[{}] [get-config] get failover ok, dataId={}, group={}, tenant={}, config={}", agent.getName(),
                dataId, group, tenant, ContentUtils.truncateContent(content));
            cr.setContent(content);
            configFilterChainManager.doFilter(null, cr);
            content = cr.getContent();
            return content;
        }

        try {
            content = worker.getServerConfig(dataId, group, tenant, timeoutMs);

            cr.setContent(content);

            configFilterChainManager.doFilter(null, cr);
            content = cr.getContent();

            return content;
        } catch (NacosException ioe) {
            if (NacosException.NO_RIGHT == ioe.getErrCode()) {
                throw ioe;
            }
            LOGGER.warn("[{}] [get-config] get from server error, dataId={}, group={}, tenant={}, msg={}",
                agent.getName(), dataId, group, tenant, ioe.toString());
        }

        LOGGER.warn("[{}] [get-config] get snapshot ok, dataId={}, group={}, tenant={}, config={}", agent.getName(),
            dataId, group, tenant, ContentUtils.truncateContent(content));
        content = LocalConfigInfoProcessor.getSnapshot(agent.getName(), dataId, group, tenant);
        cr.setContent(content);
        configFilterChainManager.doFilter(null, cr);
        content = cr.getContent();
        return content;
    }
逻辑解释:
本地相关路径可以从com.alibaba.nacos.client.config.impl.LocalConfigInfoProcessor 类查看,也可以启动设置:
1. 优先获取本地配置;
~/nacos/config/${serverName_8848}_nacos/data/config-data/${group}/${dataId}
比如我的:
/Users/xxx/nacos/config/fixed-ip_port_nacos/data/config-data/DEFAULT_GROUP/template.yaml
2. 如果获取到就返回本地文件,获取不到就走http 到服务端拉取
3. 如果获取远程服务报错(远程服务不可达或其他错误),就从本地的snapshot 快照文件读取。快照目录和正式的区别是data 换位 snapshot 文件夹,其他存储位置是一样的。
(2). 继续调用到 com.alibaba.nacos.client.config.impl.ClientWorker#getServerConfig
public String getServerConfig(String dataId, String group, String tenant, long readTimeout)
        throws NacosException {
        if (StringUtils.isBlank(group)) {
            group = Constants.DEFAULT_GROUP;
        }

        HttpResult result = null;
        try {
            List<String> params = null;
            if (StringUtils.isBlank(tenant)) {
                params = Arrays.asList("dataId", dataId, "group", group);
            } else {
                params = Arrays.asList("dataId", dataId, "group", group, "tenant", tenant);
            }
            result = agent.httpGet(Constants.CONFIG_CONTROLLER_PATH, null, params, agent.getEncode(), readTimeout);
        } catch (IOException e) {
            String message = String.format(
                "[%s] [sub-server] get server config exception, dataId=%s, group=%s, tenant=%s", agent.getName(),
                dataId, group, tenant);
            LOGGER.error(message, e);
            throw new NacosException(NacosException.SERVER_ERROR, e);
        }

        switch (result.code) {
            case HttpURLConnection.HTTP_OK:
                LocalConfigInfoProcessor.saveSnapshot(agent.getName(), dataId, group, tenant, result.content);
                return result.content;
            case HttpURLConnection.HTTP_NOT_FOUND:
                LocalConfigInfoProcessor.saveSnapshot(agent.getName(), dataId, group, tenant, null);
                return null;
            case HttpURLConnection.HTTP_CONFLICT: {
                LOGGER.error(
                    "[{}] [sub-server-error] get server config being modified concurrently, dataId={}, group={}, "
                        + "tenant={}", agent.getName(), dataId, group, tenant);
                throw new NacosException(NacosException.CONFLICT,
                    "data being modified, dataId=" + dataId + ",group=" + group + ",tenant=" + tenant);
            }
            case HttpURLConnection.HTTP_FORBIDDEN: {
                LOGGER.error("[{}] [sub-server-error] no right, dataId={}, group={}, tenant={}", agent.getName(), dataId,
                    group, tenant);
                throw new NacosException(result.code, result.content);
            }
            default: {
                LOGGER.error("[{}] [sub-server-error]  dataId={}, group={}, tenant={}, code={}", agent.getName(), dataId,
                    group, tenant, result.code);
                throw new NacosException(result.code,
                    "http error, code=" + result.code + ",dataId=" + dataId + ",group=" + group + ",tenant=" + tenant);
            }
        }
    }
这里可以看到请求完之后会调用 com.alibaba.nacos.client.config.impl.LocalConfigInfoProcessor#saveSnapshot 去保存快照(删除或者更新快照文件, 快照文件用于从服务端拉取报错后从本地拉取)
static public void saveSnapshot(String envName, String dataId, String group, String tenant, String config) {
        if (!SnapShotSwitch.getIsSnapShot()) {
            return;
        }
        File file = getSnapshotFile(envName, dataId, group, tenant);
        if (null == config) {
            try {
                IOUtils.delete(file);
            } catch (IOException ioe) {
                LOGGER.error("[" + envName + "] delete snapshot error, " + file, ioe);
            }
        } else {
            try {
                File parentFile = file.getParentFile();
                if (!parentFile.exists()) {
                    boolean isMdOk = parentFile.mkdirs();
                    if (!isMdOk) {
                        LOGGER.error("[{}] save snapshot error", envName);
                    }
                }

                if (JVMUtil.isMultiInstance()) {
                    ConcurrentDiskUtil.writeFileContent(file, config,
                        Constants.ENCODE);
                } else {
                    IOUtils.writeStringToFile(file, config, Constants.ENCODE);
                }
            } catch (IOException ioe) {
                LOGGER.error("[" + envName + "] save snapshot error, " + file, ioe);
            }
        }
    }
(3). 继续调用到 com.alibaba.nacos.client.config.http.MetricsHttpAgent#httpGet
@Override
    public HttpResult httpGet(String path, List<String> headers, List<String> paramValues, String encoding, long readTimeoutMs) throws IOException {
        Histogram.Timer timer = MetricsMonitor.getConfigRequestMonitor("GET", path, "NA");
        HttpResult result = null;
        try {
            result = httpAgent.httpGet(path, headers, paramValues, encoding, readTimeoutMs);
        } catch (IOException e) {
            throw e;
        } finally {
            timer.observeDuration();
            timer.close();
        }

        return result;
    }
(4). 继续调用到com.alibaba.nacos.client.config.http.ServerHttpAgent#httpGet
public HttpResult httpGet(String path, List<String> headers, List<String> paramValues, String encoding,
                              long readTimeoutMs) throws IOException {
        final long endTime = System.currentTimeMillis() + readTimeoutMs;
        final boolean isSSL = false;

        String currentServerAddr = serverListMgr.getCurrentServerAddr();
        int maxRetry = this.maxRetry;

        do {
            try {
                List<String> newHeaders = getSpasHeaders(paramValues);
                if (headers != null) {
                    newHeaders.addAll(headers);
                }
                HttpResult result = HttpSimpleClient.httpGet(
                    getUrl(currentServerAddr, path), newHeaders, paramValues, encoding,
                    readTimeoutMs, isSSL);
                if (result.code == HttpURLConnection.HTTP_INTERNAL_ERROR
                    || result.code == HttpURLConnection.HTTP_BAD_GATEWAY
                    || result.code == HttpURLConnection.HTTP_UNAVAILABLE) {
                    LOGGER.error("[NACOS ConnectException] currentServerAddr: {}, httpCode: {}",
                        serverListMgr.getCurrentServerAddr(), result.code);
                } else {
                    // Update the currently available server addr
                    serverListMgr.updateCurrentServerAddr(currentServerAddr);
                    return result;
                }
            } catch (ConnectException ce) {
                LOGGER.error("[NACOS ConnectException httpGet] currentServerAddr:{}, err : {}", serverListMgr.getCurrentServerAddr(), ce.getMessage());
            } catch (SocketTimeoutException stoe) {
                LOGGER.error("[NACOS SocketTimeoutException httpGet] currentServerAddr:{}, err : {}", serverListMgr.getCurrentServerAddr(), stoe.getMessage());
            } catch (IOException ioe) {
                LOGGER.error("[NACOS IOException httpGet] currentServerAddr: " + serverListMgr.getCurrentServerAddr(), ioe);
                throw ioe;
            }

            if (serverListMgr.getIterator().hasNext()) {
                currentServerAddr = serverListMgr.getIterator().next();
            } else {
                maxRetry --;
                if (maxRetry < 0) {
                    throw new ConnectException("[NACOS HTTP-GET] The maximum number of tolerable server reconnection errors has been reached");
                }
                serverListMgr.refreshCurrentServerAddr();
            }

        } while (System.currentTimeMillis() <= endTime);

        LOGGER.error("no available server");
        throw new ConnectException("no available server");
    }
(5). 继续调用到com.alibaba.nacos.client.config.impl.HttpSimpleClient#httpGet(java.lang.String, java.util.List<java.lang.String>, java.util.List<java.lang.String>, java.lang.String, long, boolean)
HttpSimpleClient 是nacos 提供的一个工具类。
static public HttpResult httpGet(String url, List<String> headers, List<String> paramValues,
                                     String encoding, long readTimeoutMs, boolean isSSL) throws IOException {
        String encodedContent = encodingParams(paramValues, encoding);
        url += (null == encodedContent) ? "" : ("?" + encodedContent);
        if (Limiter.isLimit(MD5.getInstance().getMD5String(
            new StringBuilder(url).append(encodedContent).toString()))) {
            return new HttpResult(NacosException.CLIENT_OVER_THRESHOLD,
                "More than client-side current limit threshold");
        }

        HttpURLConnection conn = null;

        try {
            conn = (HttpURLConnection)new URL(url).openConnection();
            conn.setRequestMethod("GET");
            conn.setConnectTimeout(ParamUtil.getConnectTimeout() > 100 ? ParamUtil.getConnectTimeout() : 100);
            conn.setReadTimeout((int)readTimeoutMs);
            List<String> newHeaders = getHeaders(url, headers, paramValues);
            setHeaders(conn, newHeaders, encoding);

            conn.connect();

            int respCode = conn.getResponseCode();
            String resp = null;

            if (HttpURLConnection.HTTP_OK == respCode) {
                resp = IOUtils.toString(conn.getInputStream(), encoding);
            } else {
                resp = IOUtils.toString(conn.getErrorStream(), encoding);
            }
            return new HttpResult(respCode, conn.getHeaderFields(), resp);
        } finally {
            if (conn != null) {
                conn.disconnect();
            }
        }
    }
可以看到实际也是用HttpURLConnection 建立连接之后获取配置。用get 方式去获取配置。然后将从服务端获取的配置string 类型返回去,后面转为yaml 格式文件返回去。

2 . 服务端修改后客户端感知原理
com.alibaba.nacos.client.config.impl.ClientWorker#ClientWorker 新建的时候会创建两个线程池
public ClientWorker(final HttpAgent agent, final ConfigFilterChainManager configFilterChainManager, final Properties properties) {
        this.agent = agent;
        this.configFilterChainManager = configFilterChainManager;

        // Initialize the timeout parameter

        init(properties);

        executor = Executors.newScheduledThreadPool(1, new ThreadFactory() {
            @Override
            public Thread newThread(Runnable r) {
                Thread t = new Thread(r);
                t.setName("com.alibaba.nacos.client.Worker." + agent.getName());
                t.setDaemon(true);
                return t;
            }
        });

        executorService = Executors.newScheduledThreadPool(Runtime.getRuntime().availableProcessors(), new ThreadFactory() {
            @Override
            public Thread newThread(Runnable r) {
                Thread t = new Thread(r);
                t.setName("com.alibaba.nacos.client.Worker.longPolling." + agent.getName());
                t.setDaemon(true);
                return t;
            }
        });

        executor.scheduleWithFixedDelay(new Runnable() {
            @Override
            public void run() {
                try {
                    checkConfigInfo();
                } catch (Throwable e) {
                    LOGGER.error("[" + agent.getName() + "] [sub-check] rotate check error", e);
                }
            }
        }, 1L, 10L, TimeUnit.MILLISECONDS);
    }
1. 第一个线程池设计
第一个线程池是只拥有一个线程用来执行定时任务的 executor,executor 每隔 10ms 就会执行一次 checkConfigInfo() 方法,从方法名上可以知道是每 10 ms 检查一次配置信息。
// checkConfigInfo 方法是取出了一批任务,然后提交给 executorService 线程池去执行,执行的任务就是 LongPollingRunnable,每个任务都有一个 taskId。
	public void checkConfigInfo() {
        // 分任务
        int listenerSize = cacheMap.get().size();
        // 向上取整为批数
        int longingTaskCount = (int) Math.ceil(listenerSize / ParamUtil.getPerTaskConfigSize());
        if (longingTaskCount > currentLongingTaskCount) {
            for (int i = (int) currentLongingTaskCount; i < longingTaskCount; i++) {
                // 要判断任务是否在执行 这块需要好好想想。 任务列表现在是无序的。变化过程可能有问题
                executorService.execute(new LongPollingRunnable(i));
            }
            currentLongingTaskCount = longingTaskCount;
        }
    }
这块的设计是每3000个在一个任务跑批。 ParamUtil.getPerTaskConfigSize() 是3000。 相当于每3000 个缓存在一个LongPollingRunnable 长轮询任务处理。
可以看到LongPollingRunnable 有个字段taskId, run 方法会用该字段和 cacheData.getTaskId() 做比较。cacheData.getTaskId() 默认是0, 在缓存添加的时候会设置TaskId。
/**
缓存数据。 可以看到 content 是默认先从本地磁盘获取。
*/
public class CacheData {
    ...

    private int taskId;

    public void setTaskId(int taskId) {
        this.taskId = taskId;
    }

    public CacheData(ConfigFilterChainManager configFilterChainManager, String name, String dataId, String group,
                     String tenant) {
        if (null == dataId || null == group) {
            throw new IllegalArgumentException("dataId=" + dataId + ", group=" + group);
        }
        this.name = name;
        this.configFilterChainManager = configFilterChainManager;
        this.dataId = dataId;
        this.group = group;
        this.tenant = tenant;
        listeners = new CopyOnWriteArrayList<ManagerListenerWrap>();
        this.isInitializing = true;
        this.content = loadCacheContentFromDiskLocal(name, dataId, group, tenant);
        this.md5 = getMd5String(content);
    }

  ....
}
cacheData 如下:
- (应用启动完成之后进行加载,加载完之后调用NacosContextRefresher(实现了ApplicationListener) registerNacosListenersForApplications, 然后添加listener)
private void registerNacosListener(final String group, final String dataId) {

		Listener listener = listenerMap.computeIfAbsent(dataId, i -> new Listener() {
			@Override
			public void receiveConfigInfo(String configInfo) {
				refreshCountIncrement();
				String md5 = "";
				if (!StringUtils.isEmpty(configInfo)) {
					try {
						MessageDigest md = MessageDigest.getInstance("MD5");
						md5 = new BigInteger(1, md.digest(configInfo.getBytes("UTF-8")))
								.toString(16);
					}
					catch (NoSuchAlgorithmException | UnsupportedEncodingException e) {
						log.warn("[Nacos] unable to get md5 for dataId: " + dataId, e);
					}
				}
				refreshHistory.add(dataId, md5);
				applicationContext.publishEvent(
						new RefreshEvent(this, null, "Refresh Nacos config"));
				if (log.isDebugEnabled()) {
					log.debug("Refresh Nacos config group " + group + ",dataId" + dataId);
				}
			}

			@Override
			public Executor getExecutor() {
				return null;
			}
		});

		try {
			configService.addListener(dataId, group, listener);
		}
		catch (NacosException e) {
			e.printStackTrace();
		}
}- 继续调用到com.alibaba.nacos.client.config.impl.ClientWorker#addTenantListeners
public void addTenantListeners(String dataId, String group, List<? extends Listener> listeners) throws NacosException {
        group = null2defaultGroup(group);
        String tenant = agent.getTenant();
        CacheData cache = addCacheDataIfAbsent(dataId, group, tenant);
        for (Listener listener : listeners) {
            cache.addListener(listener);
        }
    }
(1). CacheData cache = addCacheDataIfAbsent(dataId, group, tenant); 创建cacheData

(2). 最后调用com.alibaba.nacos.client.config.impl.CacheData#addListener 将listener 维护到自己的集合中
public void addListener(Listener listener) {
        if (null == listener) {
            throw new IllegalArgumentException("listener is null");
        }
        ManagerListenerWrap wrap = new ManagerListenerWrap(listener, md5);
        if (listeners.addIfAbsent(wrap)) {
            LOGGER.info("[{}] [add-listener] ok, tenant={}, dataId={}, group={}, cnt={}", name, tenant, dataId, group,
                listeners.size());
        }
    }
2. 第二个线程池设计
第二个线程池是一个普通的线程池,从 ThreadFactory 的名称可以看到这个线程池是做长轮询的。LongPollingRunnable 做了什么,主要分为两部分,第一部分是检查本地的配置信息,第二部分是获取服务端的配置信息然后更新到本地。
class LongPollingRunnable implements Runnable {
        private int taskId;

        public LongPollingRunnable(int taskId) {
            this.taskId = taskId;
        }

        @Override
        public void run() {

            List<CacheData> cacheDatas = new ArrayList<CacheData>();
            List<String> inInitializingCacheList = new ArrayList<String>();
            try {
                // check failover config
                for (CacheData cacheData : cacheMap.get().values()) {
                    if (cacheData.getTaskId() == taskId) {
                        cacheDatas.add(cacheData);
                        try {
                            checkLocalConfig(cacheData);
                            if (cacheData.isUseLocalConfigInfo()) {
                                cacheData.checkListenerMd5();
                            }
                        } catch (Exception e) {
                            LOGGER.error("get local config info error", e);
                        }
                    }
                }

                // check server config
                List<String> changedGroupKeys = checkUpdateDataIds(cacheDatas, inInitializingCacheList);

                for (String groupKey : changedGroupKeys) {
                    String[] key = GroupKey.parseKey(groupKey);
                    String dataId = key[0];
                    String group = key[1];
                    String tenant = null;
                    if (key.length == 3) {
                        tenant = key[2];
                    }
                    try {
                        String content = getServerConfig(dataId, group, tenant, 3000L);
                        CacheData cache = cacheMap.get().get(GroupKey.getKeyTenant(dataId, group, tenant));
                        cache.setContent(content);
                        LOGGER.info("[{}] [data-received] dataId={}, group={}, tenant={}, md5={}, content={}",
                            agent.getName(), dataId, group, tenant, cache.getMd5(),
                            ContentUtils.truncateContent(content));
                    } catch (NacosException ioe) {
                        String message = String.format(
                            "[%s] [get-update] get changed config exception. dataId=%s, group=%s, tenant=%s",
                            agent.getName(), dataId, group, tenant);
                        LOGGER.error(message, ioe);
                    }
                }
                for (CacheData cacheData : cacheDatas) {
                    if (!cacheData.isInitializing() || inInitializingCacheList
                        .contains(GroupKey.getKeyTenant(cacheData.dataId, cacheData.group, cacheData.tenant))) {
                        cacheData.checkListenerMd5();
                        cacheData.setInitializing(false);
                    }
                }
                inInitializingCacheList.clear();

                executorService.execute(this);

            } catch (Throwable e) {

                // If the rotation training task is abnormal, the next execution time of the task will be punished
                LOGGER.error("longPolling error : ", e);
                executorService.schedule(this, taskPenaltyTime, TimeUnit.MILLISECONDS);
            }
        }
    }
重要过程:
- 本地配置检查和监听器的 md5 检查
- 检测服务器数据变更:
通过 checkUpdateDataIds() 方法从服务端获取那些值发生了变化的 dataId 列表,
通过 getServerConfig 方法,根据 dataId 到服务端获取最新的配置信息,接着将最新的配置信息保存到 CacheData 中。
调用 CacheData 的 checkListenerMd5 方法,可以看到该方法在第一部分也被调用过。
- 在该任务的最后,又重新通过 executorService 提交了本任务。
1. 本地配置检查和监听器的 md5 检查
遍历cacheMap的信息,然后添加到cacheDatas中。循环中检查本地文件。获取到的cacheMap 是:

com.alibaba.nacos.client.config.impl.ClientWorker#checkLocalConfig:
private void checkLocalConfig(CacheData cacheData) {
        final String dataId = cacheData.dataId;
        final String group = cacheData.group;
        final String tenant = cacheData.tenant;
        File path = LocalConfigInfoProcessor.getFailoverFile(agent.getName(), dataId, group, tenant);

        // 没有 -> 有
        if (!cacheData.isUseLocalConfigInfo() && path.exists()) {
            String content = LocalConfigInfoProcessor.getFailover(agent.getName(), dataId, group, tenant);
            String md5 = MD5.getInstance().getMD5String(content);
            cacheData.setUseLocalConfigInfo(true);
            cacheData.setLocalConfigInfoVersion(path.lastModified());
            cacheData.setContent(content);

            LOGGER.warn("[{}] [failover-change] failover file created. dataId={}, group={}, tenant={}, md5={}, content={}",
                agent.getName(), dataId, group, tenant, md5, ContentUtils.truncateContent(content));
            return;
        }

        // 有 -> 没有。不通知业务监听器,从server拿到配置后通知。
        if (cacheData.isUseLocalConfigInfo() && !path.exists()) {
            cacheData.setUseLocalConfigInfo(false);
            LOGGER.warn("[{}] [failover-change] failover file deleted. dataId={}, group={}, tenant={}", agent.getName(),
                dataId, group, tenant);
            return;
        }

        // 有变更
        if (cacheData.isUseLocalConfigInfo() && path.exists()
            && cacheData.getLocalConfigInfoVersion() != path.lastModified()) {
            String content = LocalConfigInfoProcessor.getFailover(agent.getName(), dataId, group, tenant);
            String md5 = MD5.getInstance().getMD5String(content);
            cacheData.setUseLocalConfigInfo(true);
            cacheData.setLocalConfigInfoVersion(path.lastModified());
            cacheData.setContent(content);
            LOGGER.warn("[{}] [failover-change] failover file changed. dataId={}, group={}, tenant={}, md5={}, content={}",
                agent.getName(), dataId, group, tenant, md5, ContentUtils.truncateContent(content));
        }
    }
2. 获取服务端发生变更的配置信息然后更新到本地
- com.alibaba.nacos.client.config.impl.ClientWorker#checkUpdateDataIds调用com.alibaba.nacos.client.config.impl.ClientWorker#checkUpdateConfigStr 获取服务器端发生变化的数据
List<String> checkUpdateConfigStr(String probeUpdateString, boolean isInitializingCacheList) throws IOException {

        List<String> params = Arrays.asList(Constants.PROBE_MODIFY_REQUEST, probeUpdateString);

        List<String> headers = new ArrayList<String>(2);
        headers.add("Long-Pulling-Timeout");
        headers.add("" + timeout);

        // told server do not hang me up if new initializing cacheData added in
        if (isInitializingCacheList) {
            headers.add("Long-Pulling-Timeout-No-Hangup");
            headers.add("true");
        }

        if (StringUtils.isBlank(probeUpdateString)) {
            return Collections.emptyList();
        }

        try {
            HttpResult result = agent.httpPost(Constants.CONFIG_CONTROLLER_PATH + "/listener", headers, params,
                agent.getEncode(), timeout);

            if (HttpURLConnection.HTTP_OK == result.code) {
                setHealthServer(true);
                return parseUpdateDataIdResponse(result.content);
            } else {
                setHealthServer(false);
                LOGGER.error("[{}] [check-update] get changed dataId error, code: {}", agent.getName(), result.code);
            }
        } catch (IOException e) {
            setHealthServer(false);
            LOGGER.error("[" + agent.getName() + "] [check-update] get changed dataId exception", e);
            throw e;
        }
        return Collections.emptyList();
    }
最后的参数如下:
地址: /v1/cs/configs/listener
头: [Long-Pulling-Timeout, 30000, Long-Pulling-Timeout-No-Hangup, true]
参数: [Listening-Configs, template.yamlDEFAULT_GROUPtemplate-dev.yamlDEFAULT_GROUP13fc3b7500b7c5f5a79162a131465749]
超时时间是: 30S
可以看到是用一个30s的长链接等待服务器端数据,把可能发生变化的数据组以及对应的MD5值发生到服务器端。
如果返回的code 是200,就解析发生变化的数据:com.alibaba.nacos.client.config.impl.ClientWorker#parseUpdateDataIdResponse
private List<String> parseUpdateDataIdResponse(String response) {
        if (StringUtils.isBlank(response)) {
            return Collections.emptyList();
        }

        try {
            response = URLDecoder.decode(response, "UTF-8");
        } catch (Exception e) {
            LOGGER.error("[" + agent.getName() + "] [polling-resp] decode modifiedDataIdsString error", e);
        }

        List<String> updateList = new LinkedList<String>();

        for (String dataIdAndGroup : response.split(LINE_SEPARATOR)) {
            if (!StringUtils.isBlank(dataIdAndGroup)) {
                String[] keyArr = dataIdAndGroup.split(WORD_SEPARATOR);
                String dataId = keyArr[0];
                String group = keyArr[1];
                if (keyArr.length == 2) {
                    updateList.add(GroupKey.getKey(dataId, group));
                    LOGGER.info("[{}] [polling-resp] config changed. dataId={}, group={}", agent.getName(), dataId, group);
                } else if (keyArr.length == 3) {
                    String tenant = keyArr[2];
                    updateList.add(GroupKey.getKeyTenant(dataId, group, tenant));
                    LOGGER.info("[{}] [polling-resp] config changed. dataId={}, group={}, tenant={}", agent.getName(),
                        dataId, group, tenant);
                } else {
                    LOGGER.error("[{}] [polling-resp] invalid dataIdAndGroup error {}", agent.getName(), dataIdAndGroup);
                }
            }
        }
        return updateList;
    }
1》数据没有变更返回的是""
2》有数据变更返回的是变更的group和dataId:
template-dev.yaml%02DEFAULT_GROUP%01- 如果有发生变化的数据,循环遍历之后从服务端获取数据
com.alibaba.nacos.client.config.impl.CacheData#setContent 更新内容和md5 值
public void setContent(String newContent) {
        this.content = newContent;
        this.md5 = getMd5String(content);
}- 遍历cacheData, 检查md5 值, 也就是检查上次监听的md5 值是否有修改
1》com.alibaba.nacos.client.config.impl.CacheData#checkListenerMd5
void checkListenerMd5() {
        for (ManagerListenerWrap wrap : listeners) {
            if (!md5.equals(wrap.lastCallMd5)) {
                safeNotifyListener(dataId, group, content, md5, wrap);
            }
        }
    }
2》数据发生变化之后调用到: com.alibaba.nacos.client.config.impl.CacheData#safeNotifyListener 通知listener
private void safeNotifyListener(final String dataId, final String group, final String content,
                                    final String md5, final ManagerListenerWrap listenerWrap) {
        final Listener listener = listenerWrap.listener;

        Runnable job = new Runnable() {
            @Override
            public void run() {
                ClassLoader myClassLoader = Thread.currentThread().getContextClassLoader();
                ClassLoader appClassLoader = listener.getClass().getClassLoader();
                try {
                    if (listener instanceof AbstractSharedListener) {
                        AbstractSharedListener adapter = (AbstractSharedListener) listener;
                        adapter.fillContext(dataId, group);
                        LOGGER.info("[{}] [notify-context] dataId={}, group={}, md5={}", name, dataId, group, md5);
                    }
                    // 执行回调之前先将线程classloader设置为具体webapp的classloader,以免回调方法中调用spi接口是出现异常或错用(多应用部署才会有该问题)。
                    Thread.currentThread().setContextClassLoader(appClassLoader);

                    ConfigResponse cr = new ConfigResponse();
                    cr.setDataId(dataId);
                    cr.setGroup(group);
                    cr.setContent(content);
                    configFilterChainManager.doFilter(null, cr);
                    String contentTmp = cr.getContent();
                    listener.receiveConfigInfo(contentTmp);
                    listenerWrap.lastCallMd5 = md5;
                    LOGGER.info("[{}] [notify-ok] dataId={}, group={}, md5={}, listener={} ", name, dataId, group, md5,
                        listener);
                } catch (NacosException de) {
                    LOGGER.error("[{}] [notify-error] dataId={}, group={}, md5={}, listener={} errCode={} errMsg={}", name,
                        dataId, group, md5, listener, de.getErrCode(), de.getErrMsg());
                } catch (Throwable t) {
                    LOGGER.error("[{}] [notify-error] dataId={}, group={}, md5={}, listener={} tx={}", name, dataId, group,
                        md5, listener, t.getCause());
                } finally {
                    Thread.currentThread().setContextClassLoader(myClassLoader);
                }
            }
        };

        final long startNotify = System.currentTimeMillis();
        try {
            if (null != listener.getExecutor()) {
                listener.getExecutor().execute(job);
            } else {
                job.run();
            }
        } catch (Throwable t) {
            LOGGER.error("[{}] [notify-error] dataId={}, group={}, md5={}, listener={} throwable={}", name, dataId, group,
                md5, listener, t.getCause());
        }
        final long finishNotify = System.currentTimeMillis();
        LOGGER.info("[{}] [notify-listener] time cost={}ms in ClientWorker, dataId={}, group={}, md5={}, listener={} ",
            name, (finishNotify - startNotify), dataId, group, md5, listener);
    }
可以看到过程如下:
第一步:创建一个job,也就是通知逻辑
第二步:如果listener.getExecutor() 不为空,交给线程池处理,否则变为同步调用run 方法
job 解释:
- 创建ConfigResponse 对象,
- listener.receiveConfigInfo(contentTmp); 调用到 com.alibaba.cloud.nacos.refresh.NacosContextRefresher#registerNacosListener 创建的匿名监听器
1》 记录REFRESH_COUNT 记录器
2》获取md5值,维护到历史记录中
3》利用Spring 的事件机制发布事件通知容器中对象(下章分析)applicationContext.publishEvent( new RefreshEvent(this, null, "Refresh Nacos config"));
- listenerWrap.lastCallMd5 = md5; 维护最后一次的md5 值
3. 总结
大致可以理解为如下过程:(客户端和服务器端都是以http进行交互)
- 服务器端启动的时候从服务器端拉取数据:
(1). 拉取完之后将文件记录到本地的snapshot 快照文件(防止下次拉取exception之后进行兜底)。
(2). 创建一个CacheData 对象,包含content内容、md5值、listener(用于变更后通知等机制)等
- 启动一个异步线程池调度长轮询任务。 长轮询中以30s时间,调用服务器端listener 接口获取发生变更的数据。有变更之后再次走1获取配置的流程,同时调用cacheData中的listener 发布Spring RefreshEvent 通知对象更新
nacos切入Spring 做配置中心几个重要的类:(结合这几个类可以实现自己的配置中心)
(1). NacosPropertySource 用于封装获取到的Properties 的类
public class NacosPropertySource extends MapPropertySource {
(2). NacosPropertySourceBuilder NacosPropertySource 构造器,用于构造NacosPropertySource。 内部获取Str 进行转换
(3). NacosPropertySourceLocator 用于注入到Spring 中,获取PropertySource 对象
public class NacosPropertySourceLocator implements PropertySourceLocator {
  ...
    public PropertySource<?> locate(Environment env) {
    ...
(4). CompositePropertySource 组合的属性源。内部维护多个PropertySource
public class CompositePropertySource extends EnumerablePropertySource<Object> {
    private final Set<PropertySource<?>> propertySources = new LinkedHashSet();

    public CompositePropertySource(String name) {
        super(name);
    }
  ...

====配置以及自动注入相关
(5). NacosConfigAutoConfiguration 自动配置类, 在Springboot的SPI机制。spring.factories 文件引入(必须用BootstrapConfiguration 做前缀引导进去)
org.springframework.cloud.bootstrap.BootstrapConfiguration=\
com.alibaba.cloud.nacos.NacosConfigBootstrapConfiguration
org.springframework.boot.autoconfigure.EnableAutoConfiguration=\
com.alibaba.cloud.nacos.NacosConfigAutoConfiguration,\
com.alibaba.cloud.nacos.endpoint.NacosConfigEndpointAutoConfiguration
org.springframework.boot.diagnostics.FailureAnalyzer=\
com.alibaba.cloud.nacos.diagnostics.analyzer.NacosConnectionFailureAnalyzer
(6). NacosConfigBootstrapConfiguration 也是一个自动配置配,内部注入NacosPropertySourceLocator
(7). NacosConfigProperties nacos 配置中心相关配置类
4. 服务器端
上面可以了解到,客户端心跳、获取配置、获取变更的配置等都是以http 形式从服务器端获取的。简单了解下服务器端发生变更之后通知到客户端原理。
服务器端用的是异步的Servlet,AsyncServlet 来进行处理的。这种方式可以用Spring的长轮询,也可以用Servlet 的异步Servlet。 就是用更少的线程可以hold 更多的请求。
【当你用心写完每一篇博客之后,你会发现它比你用代码实现功能更有成就感!】
好博客就要一起分享哦!分享海报
此处可发布评论
评论(0)展开评论
展开评论

