nacos原理(二)更新Spring容器对象
标签: nacos原理(二)更新Spring容器对象 Oracle博客 51CTO博客
2023-03-25 18:45:44 136浏览
Spring 容器感知分为两部分。 第一部分是更新Environment、第二部分是注册到Spring 容器的对象感知。
1. 更新Environment
上文知道对于配置发生改变会调用到com.alibaba.cloud.nacos.refresh.NacosContextRefresher#registerNacosListener内部代码块中的匿名Listener会调用NacosContextRefresher.this.applicationContext.publishEvent(new RefreshEvent(this, (Object)null, "Refresh Nacos config"));发送事件。
- 调用org.springframework.cloud.endpoint.event.RefreshEventListener#onApplicationEvent 处理
@Override
	public void onApplicationEvent(ApplicationEvent event) {
		if (event instanceof ApplicationReadyEvent) {
			handle((ApplicationReadyEvent) event);
		}
		else if (event instanceof RefreshEvent) {
			handle((RefreshEvent) event);
		}
	}

	public void handle(RefreshEvent event) {
		if (this.ready.get()) { // don't handle events before app is ready
			log.debug("Event received " + event.getEventDesc());
			Set<String> keys = this.refresh.refresh();
			log.info("Refresh keys changed: " + keys);
		}
}- 继续调用 org.springframework.cloud.context.refresh.ContextRefresher#refresh 进行刷新
public synchronized Set<String> refresh() {
		Set<String> keys = refreshEnvironment();
		this.scope.refreshAll();
		return keys;
	}
1》refreshEnvironment 更新environment 对象
public synchronized Set<String> refreshEnvironment() {
    // 获取到所有的k、v 配置
		Map<String, Object> before = extract(
				this.context.getEnvironment().getPropertySources());
    // 更新配置文件,更新environment 对象
		addConfigFilesToEnvironment();
    // 对比前后发生变化的
		Set<String> keys = changes(before,
				extract(this.context.getEnvironment().getPropertySources())).keySet();
    // 发送new EnvironmentChangeEvent(this.context, keys) 改变事件
		this.context.publishEvent(new EnvironmentChangeEvent(this.context, keys));
		return keys;
	}

ConfigurableApplicationContext addConfigFilesToEnvironment() {
		ConfigurableApplicationContext capture = null;
		try {
      // 利用现有的environment 对象,拷贝一个environment 对象
			StandardEnvironment environment = copyEnvironment(
					this.context.getEnvironment());
      // 重启启动容器,获取一个全新的environment 对象配置(不会新建所有的单例bean)
			SpringApplicationBuilder builder = new SpringApplicationBuilder(Empty.class)
					.bannerMode(Mode.OFF).web(WebApplicationType.NONE)
					.environment(environment);
			// Just the listeners that affect the environment (e.g. excluding logging
			// listener because it has side effects)
			builder.application()
					.setListeners(Arrays.asList(new BootstrapApplicationListener(),
							new ConfigFileApplicationListener()));
			capture = builder.run();

			if (environment.getPropertySources().contains(REFRESH_ARGS_PROPERTY_SOURCE)) {
				environment.getPropertySources().remove(REFRESH_ARGS_PROPERTY_SOURCE);
			}

      // 获取原有容器的配置
			MutablePropertySources target = this.context.getEnvironment()
					.getPropertySources();
			String targetName = null;

      // 遍历所有的source,如果不是standardSources进行替换。 也就是更新原来容器的environment 中的属性
			for (PropertySource<?> source : environment.getPropertySources()) {
				String name = source.getName();
				if (target.contains(name)) {
					targetName = name;
				}
				if (!this.standardSources.contains(name)) {
					if (target.contains(name)) {
						target.replace(name, source);
					}
					else {
						if (targetName != null) {
							target.addAfter(targetName, source);
						}
						else {
							// targetName was null so we are at the start of the list
							target.addFirst(source);
							targetName = name;
						}
					}
				}
			}
		}
		finally {
			ConfigurableApplicationContext closeable = capture;
			while (closeable != null) {
				try {
					closeable.close();
				}
				catch (Exception e) {
					// Ignore;
				}
				if (closeable.getParent() instanceof ConfigurableApplicationContext) {
					closeable = (ConfigurableApplicationContext) closeable.getParent();
				}
				else {
					break;
				}
			}
		}
		return capture;
	}
到这里Spring 容器的Environment 对象的属性就感知到变化。
2. Spring 容器对象感知
Spring 动态监听配置中心属性变化,需要配置注解:@RefreshScope
/**
 * Convenience annotation to put a <code>@Bean</code> definition in
 * {@link org.springframework.cloud.context.scope.refresh.RefreshScope refresh scope}.
 * Beans annotated this way can be refreshed at runtime and any components that are using
 * them will get a new instance on the next method call, fully initialized and injected
 * with all dependencies.
 *
 * @author Dave Syer
 *
 */
@Target({ ElementType.TYPE, ElementType.METHOD })
@Retention(RetentionPolicy.RUNTIME)
@Scope("refresh")
@Documented
public @interface RefreshScope {

	/**
	 * @see Scope#proxyMode()
	 * @return proxy mode
	 */
	ScopedProxyMode proxyMode() default ScopedProxyMode.TARGET_CLASS;

}
可以看出是扩展了一种新的scope refresh。
- 对于加了此注解的对象
@RestController
@RefreshScope // 支持Nacos的动态刷新功能
@RequestMapping("/nacos/config/")
public class NacosConfigController {

    @Value("${test.info}")
    private String configInfo;
在Spring 容器启动过程中获取 org.springframework.context.annotation.AnnotationScopeMetadataResolver#resolveScopeMetadata 解析到的scope是refresh

- Spring 容器启动过程中获取bean,org.springframework.beans.factory.support.AbstractBeanFactory#doGetBean
protected <T> T doGetBean(String name, @Nullable Class<T> requiredType, @Nullable Object[] args, boolean typeCheckOnly) throws BeansException {
        String beanName = this.transformedBeanName(name);
        ...

            try {
                RootBeanDefinition mbd = this.getMergedLocalBeanDefinition(beanName);
                this.checkMergedBeanDefinition(mbd, beanName, args);
                String[] dependsOn = mbd.getDependsOn();
                String[] prototypeInstance;
                ...

                if (mbd.isSingleton()) {
                   // ... 单例
                    bean = this.getObjectForBeanInstance(sharedInstance, name, beanName, mbd);
                } else if (mbd.isPrototype()) {
                    // 原型模式
                } else {
                  // 其他scope
                    String scopeName = mbd.getScope();
                    Scope scope = (Scope)this.scopes.get(scopeName);
                    if (scope == null) {
                        throw new IllegalStateException("No Scope registered for scope name '" + scopeName + "'");
                    }
                  // 可以看到其他模式是调用scope 去获取对象

                    try {
                        Object scopedInstance = scope.get(beanName, () -> {
                            this.beforePrototypeCreation(beanName);

                            Object var4;
                            try {
                                var4 = this.createBean(beanName, mbd, args);
                            } finally {
                                this.afterPrototypeCreation(beanName);
                            }

                            return var4;
                        });
                        bean = this.getObjectForBeanInstance(scopedInstance, name, beanName, mbd);
                    }
            }
    }
0》 对于beanName 会增加前缀变为: scopedTarget.nacosConfigController
1》 this.scopes包含的对象如下:
{restart=org.springframework.boot.devtools.restart.RestartScopeInitializer$RestartScope@4647aae9, request=org.springframework.web.context.request.RequestScope@119b0657, session=org.springframework.web.context.request.SessionScope@4a0fefe6, refresh=org.springframework.cloud.context.scope.refresh.RefreshScope@16597ef1, application=org.springframework.web.context.support.ServletContextScope@def2f5c}2》scope 的实现如下:
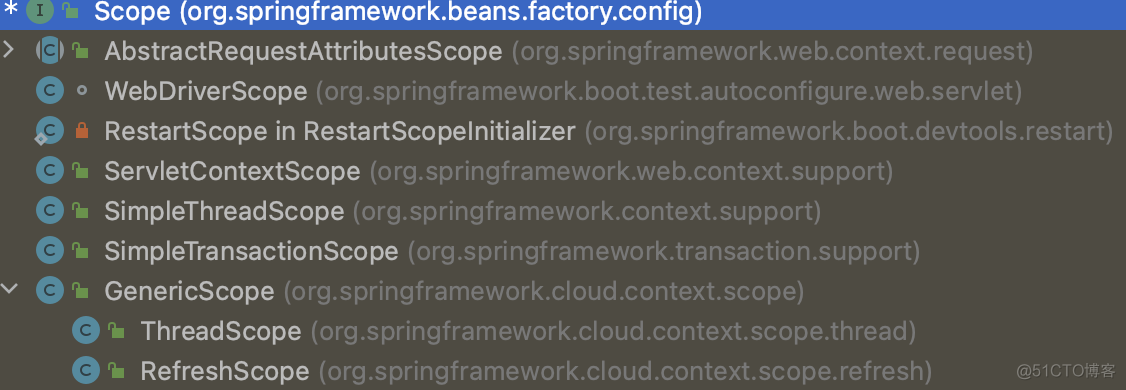
3》refresh对象的创建会调用到父类org.springframework.cloud.context.scope.GenericScope#get
@Override
	public Object get(String name, ObjectFactory<?> objectFactory) {
    // 看到是每次都put,底层还是ConcurrentHashMap.putIfAbsent
		BeanLifecycleWrapper value = this.cache.put(name,
				new BeanLifecycleWrapper(name, objectFactory));
		this.locks.putIfAbsent(name, new ReentrantReadWriteLock());
		try {
			return value.getBean();
		}
		catch (RuntimeException e) {
			this.errors.put(name, e);
			throw e;
		}
	}
org.springframework.cloud.context.scope.GenericScope.BeanLifecycleWrapper#getBean
public Object getBean() {
			if (this.bean == null) {
				synchronized (this.name) {
					if (this.bean == null) {
						this.bean = this.objectFactory.getObject();
					}
				}
			}
			return this.bean;
		}
可以看到如果缓存中有对象,就从缓存中拿对象。
没有就调用到org.springframework.beans.factory.support.AbstractBeanFactory#doGetBean 匿名工厂的对象,然后创建对象; 创建完成维护到自己的缓存中。
在有缓存的情况下可以看成等价于单例模式。
- 配置更新的情况下如何更新Spring容器的对象
从上面refresh scope 的创建等过程可以了解到。 如果想要实现重新加载,直接将org.springframework.cloud.context.scope.GenericScope#cache 清空即可。 这样在Spring 容器下次doGetBean 的时候会再次创建对象。
(1). 在上面了解到更新environment 对象过程中会调用到org.springframework.cloud.context.refresh.ContextRefresher#refresh
public synchronized Set<String> refresh() {
		Set<String> keys = refreshEnvironment();
		this.scope.refreshAll();
		return keys;
	}
(2). org.springframework.cloud.context.scope.refresh.RefreshScope#refreshAll
public void refreshAll() {
		super.destroy();
		this.context.publishEvent(new RefreshScopeRefreshedEvent());
	}
(3). super.destroy(); 调用到org.springframework.cloud.context.scope.GenericScope#destroy()
public void destroy() {
		List<Throwable> errors = new ArrayList<Throwable>();
		Collection<BeanLifecycleWrapper> wrappers = this.cache.clear();
		for (BeanLifecycleWrapper wrapper : wrappers) {
			try {
				Lock lock = this.locks.get(wrapper.getName()).writeLock();
				lock.lock();
				try {
					wrapper.destroy();
				}
				finally {
					lock.unlock();
				}
			}
			catch (RuntimeException e) {
				errors.add(e);
			}
		}
		if (!errors.isEmpty()) {
			throw wrapIfNecessary(errors.get(0));
		}
		this.errors.clear();
	}
可以看到核心操作也是清空了cache 对象。 拿到缓存中所有对象,获取到lock 之后调用destroy 进行销毁。双层保存缓存的bean 为空。
org.springframework.cloud.context.scope.GenericScope.BeanLifecycleWrapper#destroy
public void destroy() {
			if (this.callback == null) {
				return;
			}
			synchronized (this.name) {
				Runnable callback = this.callback;
				if (callback != null) {
					callback.run();
				}
				this.callback = null;
				this.bean = null;
			}
		}
3. 测试
按照上述理解,配置发生变化,environment 对象不会改变(内部属性变化),非@RefreshScope 对象不会变,@RefreshScope 对象会新建。
测试类:
package cn.qz.template.controller;

import org.springframework.beans.factory.annotation.Autowired;
import org.springframework.beans.factory.annotation.Value;
import org.springframework.cloud.context.config.annotation.RefreshScope;
import org.springframework.core.env.Environment;
import org.springframework.web.bind.annotation.GetMapping;
import org.springframework.web.bind.annotation.RequestMapping;
import org.springframework.web.bind.annotation.RestController;

@RestController
@RefreshScope // 支持Nacos的动态刷新功能
@RequestMapping("/nacos/config/")
public class NacosConfigController {

    @Value("${test.info}")
    private String configInfo;

    @Autowired
    private Environment environment;

    @GetMapping("/configInfo")
    public String configInfo() {
        return String.format("configInfo: %s, this: %s, environment: %s", configInfo, this.hashCode(), environment.hashCode());
//        return configInfo + "\t" + this.hashCode();
    }

}
curl 测试:
qiao-zhi@qiao-zhideMBP xm % curl http://127.0.0.1:8090/nacos/config/configInfo
{"code":0,"msg":null,"data":"configInfo: 自己的测试文件, this: 42622108, environment: 608645018","success":true}%
qiao-zhi@qiao-zhideMBP xm % curl http://127.0.0.1:8090/nacos/config/configInfo
{"code":0,"msg":null,"data":"configInfo: 自己的测试文件update, this: 115689160, environment: 608645018","success":true}%
qiao-zhi@qiao-zhideMBP xm %
4. 总结
== nacos 做的操作(自己写自己的配置中心需要写这块逻辑)
- com.alibaba.nacos.client.config.impl.CacheData 一个重要的数据结构,内部维护了data、md5 值、listener 等属性。根据md5 值是否发生变化检测是否需要更新数据。 如果md5 发生变化,调用CacheData#safeNotifyListener通知监听器
- NacosContextRefresher 向上面的cacheDate 注册监听器:(NacosContextRefresher 需要在Springboot 的自动配置进行注入,否则RefreshEventListener 不生效)
public class NacosContextRefresher implements ApplicationListener<ApplicationReadyEvent>, ApplicationContextAware {

      public void onApplicationEvent(ApplicationReadyEvent event) {
        if (this.ready.compareAndSet(false, true)) {
            this.registerNacosListenersForApplications();
        }

    }
      private void registerNacosListenersForApplications() {
        if (this.refreshProperties.isEnabled()) {
            Iterator var1 = NacosPropertySourceRepository.getAll().iterator();

            while(var1.hasNext()) {
                NacosPropertySource nacosPropertySource = (NacosPropertySource)var1.next();
                if (nacosPropertySource.isRefreshable()) {
                    String dataId = nacosPropertySource.getDataId();
                    this.registerNacosListener(nacosPropertySource.getGroup(), dataId);
                }
            }
        }

    }

  private void registerNacosListener(final String group, final String dataId) {
        Listener listener = (Listener)this.listenerMap.computeIfAbsent(dataId, (i) -> {
            return new Listener() {
                public void receiveConfigInfo(String configInfo) {
                    NacosContextRefresher.refreshCountIncrement();
                    String md5 = "";
                    if (!StringUtils.isEmpty(configInfo)) {
                        try {
                            MessageDigest md = MessageDigest.getInstance("MD5");
                            md5 = (new BigInteger(1, md.digest(configInfo.getBytes("UTF-8")))).toString(16);
                        } catch (UnsupportedEncodingException | NoSuchAlgorithmException var4) {
                            NacosContextRefresher.log.warn("[Nacos] unable to get md5 for dataId: " + dataId, var4);
                        }
                    }

                    NacosContextRefresher.this.refreshHistory.add(dataId, md5);
                    NacosContextRefresher.this.applicationContext.publishEvent(new RefreshEvent(this, (Object)null, "Refresh Nacos config"));
                    if (NacosContextRefresher.log.isDebugEnabled()) {
                        NacosContextRefresher.log.debug("Refresh Nacos config group " + group + ",dataId" + dataId);
                    }

                }

                public Executor getExecutor() {
                    return null;
                }
            };
        });

        try {
            this.configService.addListener(dataId, group, listener);
        } catch (NacosException var5) {
            var5.printStackTrace();
        }

    }
核心就是获取当前nacos 配置的group和dataId,然后注册一个匿名监听器。监听器内部做的核心逻辑就是发布RefreshEvent
applicationContext.publishEvent(
						new RefreshEvent(this, null, "Refresh Nacos config"));
== springcloud做的操作
- org.springframework.cloud.endpoint.event.RefreshEventListener 接收RefreshEvent 事件,然后将相关的逻辑转给org.springframework.cloud.context.refresh.ContextRefresher,包括refreshEnvironment、 refresh 作用域bean 的生效。
这里注意,RefreshEventListener 继承自SmartApplicationListener。 (自定义配置中心注意这块RefreshEventListener的生效性)
(1). 获取事件对应的listener。org.springframework.context.event.AbstractApplicationEventMulticaster#supportsEvent(org.springframework.context.ApplicationListener
protected boolean supportsEvent(ApplicationListener<?> listener, ResolvableType eventType, @Nullable Class<?> sourceType) {
        GenericApplicationListener smartListener = listener instanceof GenericApplicationListener ? (GenericApplicationListener)listener : new GenericApplicationListenerAdapter(listener);
        return ((GenericApplicationListener)smartListener).supportsEventType(eventType) && ((GenericApplicationListener)smartListener).supportsSourceType(sourceType);
    }
(2)调用到具体的监听器
org.springframework.cloud.endpoint.event.RefreshEventListener#supportsEventType
	public boolean supportsEventType(Class<? extends ApplicationEvent> eventType) {
		return ApplicationReadyEvent.class.isAssignableFrom(eventType)
				|| RefreshEvent.class.isAssignableFrom(eventType);
	}

org.springframework.context.event.SmartApplicationListener#supportsSourceType
    default boolean supportsSourceType(@Nullable Class<?> sourceType) {
        return true;
    }
【当你用心写完每一篇博客之后,你会发现它比你用代码实现功能更有成就感!】
好博客就要一起分享哦!分享海报
此处可发布评论
评论(0)展开评论
展开评论

